Making Animated GIFs
First - let's make a folder on the desktop called "GIF stuff". We'll be saving all our files here.
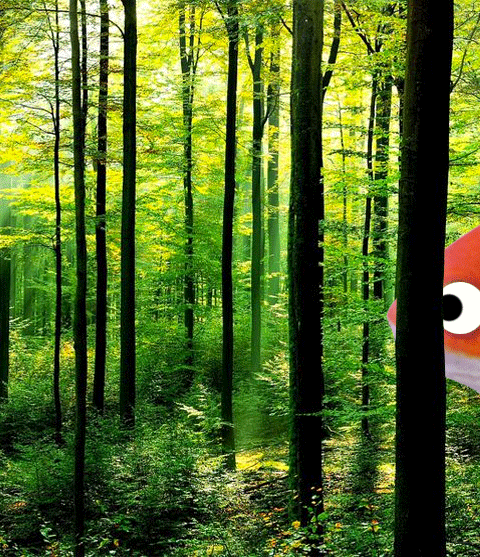
For this exercise we’re going to build a very simple 8-frame GIF animation in Photoshop. This is a bare bones GIF composed of just 2 (or 3) separate layers. An image of forest trees will be our background and the animated layer will a goldfish. I tend to ad background layers first and then bring in the animated layers later – but you can build the composition either way.
1, Open Photoshop and create a new file by clicking File/New. When the box opens make the file 500 pixels x 500 pixels x 72 dpi color mode RGB. This is the size I used for the class web page.
2, Add background: Copy and paste a jpeg image from folder, picture file, web etc. Its best if the image exceeds the size of our canvas (480 x 557). Forest example - http://assets.worldwildlife.org/photos/946/images/story_full_width/forests-why-matter_63516847.jpg?1345534028
3, Resize the image so a portion of it fills the frame of the Photoshop document by using edit/transform/scale.
4, Add the “animated” layer(s) the same way we added the background. Copy and paste a jpeg image into the Photoshop document. Its best if this image isn’t too small relative to the background – when you enlarge a small image the image quality (resolution) will be effected.
Examples:
http://www.xtremekoi.sk/files/karas-zlaty.jpg
http://www.goldfish-as-pets.com/images/dreamstime_5422385cometgoldfish.jpg
5, Clean-up the image. Cut any background away using the Magic wand and Polygonal lasso tool. I'll go over this in class - but here are a couple of video's to get you familiar with this tool - PLEASE PUT HEADPHONES ON TO WATCH THESE VIDEOS!.
A short video: https://www.youtube.com/watch?v=AxEUcaskto0
6, Rest the curser over the layers panel and select large thumbnails (just my preference).
7, Now choose the select tool - top tool in the left hand tool menu bar. Position your fish layer as if it were the first frame of your animation. (The fish might be positioned entering from the right or left side of frame.)
8, Lets start animating! Open-up the timeline by clicking window/timeline. Be sure “create frame animation” is selected and then click the box. Your first frame of animation should appear.
9, Lets ad another frame. Simply click the “duplicate selected frame” icon in the timeline menu bar (next to the trash can). Now, move your fish a little bit in the direction he's swimming in. Once thats done click “duplicate selected frame” and move the fish again. Repeat the process 7 or 8 time until the fish is swimming out of frame.
10, When you're ready to preview the animation click the "play animation" button in the timeline menu bar. Be sure “forever” is selected in the lower right of the timeline and that each frame is set for .01 seconds - though you can play with the timing all you want.
To save it as a GIF animation go to file/export and then select “save for web (legacy)” Save it in the "AGIF stuff" folder we made on your desktop so you can easily retrieve it. To see how it will appear on the web right click the file and select "OPEN WITH" - and choose a web browser like Chrome.
IMPORTANT! To preserve all your layers you must save your original work as a Photoshop file:
File/Save as - name your file and save it to the folder we made in your desktop.
Use this file as a template for all other GIF animations - just rename it to suit your needs.
Add a little more complexity once you get the hang of it!
Adding a little complexity:
1, Save the photoshop file in a different name and then delete all animation frames in the timeline.
2, Duplicate the fish layer (layer/duplicate). Using the elliptical marquee tool, replace the fish’s eye with a white circle. Duplicate this new fish layer 3 times, label them A, B and C
3, Select the brush tool – (circular size 27) make the brush color black and ad an eyeball in a different place on each of the A, B, C fish layers.
4, Move the fish layer you want to start with (lets say layer A) off to the right of the frame like you did in the tutorial above. Duplicate the frame and move the fish a little.
5, Once the fish in 1/3 of the way through the frame duplicate the layer again but this time turn fish A layer "off" and switch "on" fish B (a fish with a different eye position that you made earlier). Align the fish B in a position close the the previous one - its better if its not perfect. Duplicate the frame again - now switch to fish C.
6, Once you had the fish look around a bit duplicate the layer again and switch back to the original fish A - Continue to move the fish out of frame like you did in the tutorial above.
7, Finally – experiment with adding a bit more time to the frames where the fish is looking around so it appears he pauses a bit.
More stuff to try: Take any image into our photoshop template and position it the way you want. Now, duplicate the layer 6 or 8 times. Next, go back and change the chroma, shape or filter each layer in a different way. Now create a timeline and switch each layer on for each new frame.
Try searching some random images and just paste them into your photoshop document and then make an animation out of the the chaos. Try using images that rhyme (books, hooks, cooks, looks), ad words, or a photo of YOU!
Hint: Don’t be afraid to delete and redo your timeline animation frames! Things can get pretty quirky when you start moving elements around. Just be sure not to delete your photoshop layers.
Once you get the hang of it, you might want to try making a gif from a video clip! (skip to 1:20)
https://www.youtube.com/watch?v=tUX98zcFmq8